MakeHuman Starting Tips
/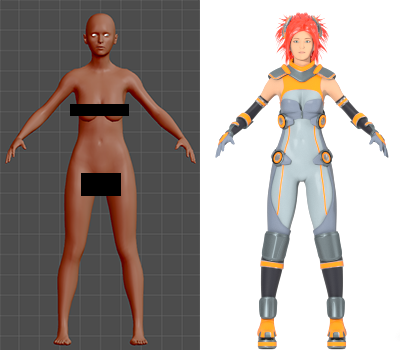
Maiko's base body in MakeHuman vs Maiko completed.
This article is part one of the Project Maiko tutorial series. Click here to return to the Project Maiko Overview.
For those of you who have not tried it yet, MakeHuman is a lot like the character creators you see at the beginnings of most modern big budget games—think Saints Row 3 or Skyrim. You use sliders to adjust the traits and proportions of your character and have fine control over many features. Except that MakeHuman gives you a rigged character with an incredible level of anatomical accuracy ready to export in the format of your choice (I use Blender, but it supports most common file formats.) And it's open source and free. For detailed information on all the excellent things MakeHuman can do, check out their site: MakeHuman.org
I started using MakeHuman in July 2013 using version 1 Alpha 7. I switched to Alpha 8 when the new body mesh was useable and worked with the nightly builds from then on. It has already saved me countless hours learning to make proper bodies from scratch. Maiko was originally generated in September 2013. At the time of this writing, we are close to a full release of Alpha 8. (Update: MakeHuman version 1.0.0 is now released!)
MakeHuman's use is fairly intuitive: you move sliders; things change. No special explanation is needed for operating the interface. The challenge is to figure out what to move the sliders to in order to get the sort of character you want. I will not claim to have mastered this. You are going to need to experiment in order to get what you want. But here are some things I have learned that should help save you some time and hassle:
1: Your model will look different at every stage.
It is very difficult to judge what a person without eyebrows and hair will look like once they have them. And if they look like a plastic mannequin, it's even harder. This is true of any 3D body you make, not just those from MakeHuman.
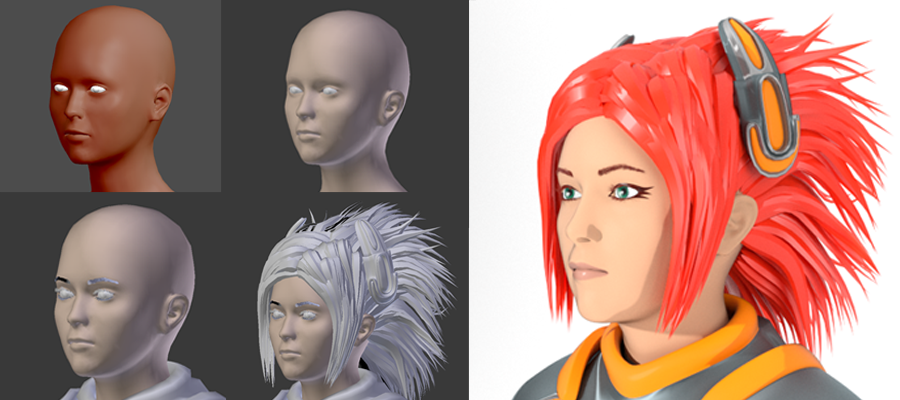
Maiko in MakeHuman, Blender Editor window with varying amounts of hair, and rendered.
MakeHuman's editor window shader is designed to make it easy to see the changes you are making to the body—not to look like real skin. MakeHuman does include some skin textures, hair and clothing you can try, but your model is going to look dramatically different when it has whatever final style you are working towards—Maiko looked like a creepy plastic doll until I got her skin material working correctly and set up proper lighting.
A model (especially the face) may look very good in MakeHuman, but turn out to look uncanny in the end, or vice versa. There are so many possible styles and different ways to shade or texture a model that you can never really judge one until it is all set up.
2: Expect to make revisions after working with it in Blender.
Make yourself a model with the approximate features you want, but don't spend time detailing them extensively until you've seen how it looks with all the trappings. Export a version early, make the hair, clothes, etc, and then go back and make necessary changes in MakeHuman and re-export. Be sure to build your items separately from the base body in case you need to change it (this mostly means use a hair cap if you are working with particle hair, as there is no good way to copy particle hair systems between bodies.) And be sure to fully clean out the old version of the body (including custom shapes, if you used them) before bringing in a new version or your file will get very cluttered.
3: If you leave sliders at default, your character will look androgynous.
The MakeHuman model begins without any specific gender. You can use the various Macro options, specifically the 'Gender' and 'Proportions' sliders, to make it male or female. But your character is still going to look fairly androgynous. To get a more distinctive differences between male and female body types, make adjustments to shoulder, torso, and hip size, and possibly even limb length.

Maiko with narrowed shoulders (torso Vshape slider) vs Maiko with default shoulders. The difference is subtle, but enough subtle differences add up.
4: Don't move sliders to extremes.

Maiko's macro settings.
Many sliders allow you to take things further than you would find in a real person. You should not have a slider all the way to one side or another unless you are pursuing very extreme features (like if you are making a stylized or exaggerated character.)
5: Most areas are influenced by multiple sliders.
Some sliders overlap. If you are adjusting them both in different ways, they may compete with each other. Sometimes you will get better results from moving several sliders a small amount than from moving one a large amount. It is important to experiment as you go along.
6: Things look different with Subdivision Surface.
It is possible for some extreme slider combinations to cause creases or visual glitches in the mesh. Keep in mind that once you are in Blender, you will have control of the model's subsurface level. Some things that will look glitched out in MakeHuman will be fine in Blender (or at least easily fixed). You can also manage the subsurf crease angles, allowing for sharper edges in places that may look too smooth in MakeHuman.
7: Use a reference.
If you are trying to create a specific person, you'll probably already have a picture of them. But even if you are not, I suggest putting together a mood board or reference folder for any given project. If you match your model up to a real person, it helps you avoid doing anything unnatural (and you can add images to MakeHuman's background). But when using a reference, it is especially important to heed my first tip, as any photograph will probably be of someone with hair and eyebrows.
8: Be careful with references that are not realistic.
While working on Maiko, I looked at many pictures of anime characters. These helped with her overall concept and outfit, but were not at all helpful when trying to make her body. Stylized art (especially if it's 2D) does not make for good references for anatomy or facial detail. This is partly because it tends to have exaggerated/idealized proportions, but mostly because it isn't playing by the same rules. It is flatter, often having the entire face visible on a flat plane even in isometric views, and does not follow proper perspective rules. You'll also find that lots of 2D character's bodies don't really hold up under their clothing (take some art of anime characters and try to trace where their bodies would be under it. The results are amusing.) If you try to emulate these sorts of characters literally, you will find yourself frustrated and with a very distorted body.
9: Be cautious when stylizing.

What you get when you try to copy anime facial proportions. Doesn't work for making it look anime, but could be very effective for making aliens.
The MakeHuman body is realistic. If your goal is a stylized character, then don't be afraid to ignore what I said earlier and push your sliders to the extremes. But if you try to directly copy a stylization, you will probably run into problems. Consider anime character facial proportions: they have large eyes, narrow chins, and small mouths. You can give the MakeHuman character facial proportions copied from anime, but it won't look much like an anime character. It will just look very uncanny. This is because the model actually has too much detail in the face. Anime faces are very undefined for the most part (especially females.) Too much detail breaks the effect.
I always planned Maiko to have less exaggerated facial proportions than normal anime characters (although she does have large eyes and a small mouth compared to most people). However, I did have issues with there being too much detail in her face. You could solve this problem by editing the mesh in Blender, or you could do what I did and just let your skin material behave in a way that doesn't actually show that much of the mesh's finer details. You could probably also lessen this issue by using one of the low poly MakeHuman proxy meshes. We may also get tools for anime style faces at some point in the future.
10: Tinker and experiment.
The best way to get good results is to experiment and let yourself learn about the program. I got the hang of it quickly by attempting to make characters in several different styles, but not worrying much about the results. I tinkered with every slider and setting. Take the time to do the same, and check out the MakeHuman forums for more information.
Follow me on Facebook to receive updates.