Militarized Police: Compositor Filter Experiment
/
The goal of the Militarized Police project is to create a low detail model suitable for decimation for use in group and crowd scenes. Currently the mesh is still at full detail for closeups and foreground shots. When dealing with low detail models, having an interesting art style is important. Low detail 3D characters tend to look rubbery or plastic. This is usually compensated for with texture painting and normal mapping. But those are time consuming to make, and are wasted on background characters that are too far away or blurred for such detail to show. If we were drawing these sorts of characters, we would use different methods. Their lack of detail would instead be covered up by brush/pencil work, or implied by a looser style.
My goal is not to have this look drawn, but to try for a similarly stylized solution. The characteristics of drawing/painting I want to use are high frequency noise (usually created by brushwork or scribbling), edge lining, exaggeration of shadows and highlights, and slight blurring/smudging. Or, in other words, to take my normally precise and clean render and dirty it up in a way that looks more interesting.

Click for full size.
This stylization comes from three sources: First is toon shaders with procedural noise in their size and smooth to break up the shadow terminator and edges of highlights (see this post for details), and slight vertex dirtying to darken crevices. Second is messy freestyle lines with small amounts of the Bezier Curve, Backbone Stretcher, and Polygonization modifiers. Third is compositor filters applied to individual passes of the image. I will show the whole node setup, and then break down what each filter is doing.
The Nodes
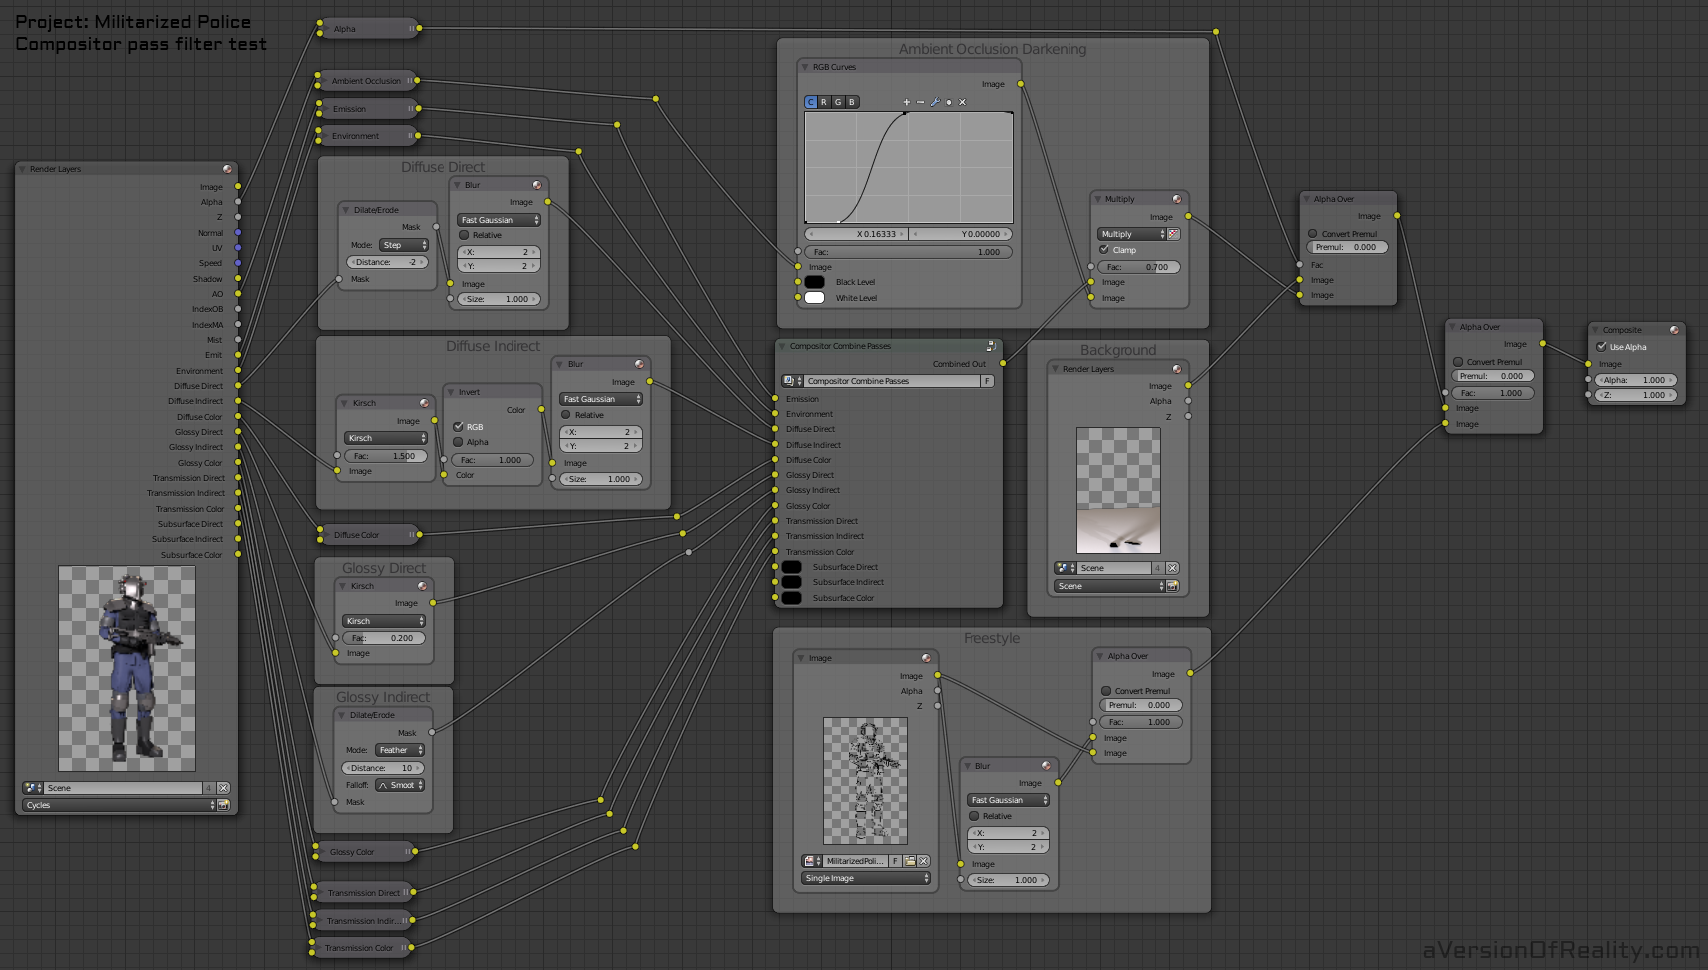
Click for full size.
For those of you less familiar with the compositor, this is multipass rendering. Normally, we deal with the image's Combined Pass (the "Image" socket at the top of the render layer node.) However, that image is the combination of many passes that contain specific data. These can be turned on in the Render Layer options. Some of these passes are additional data that is not directly part of the Combined pass, but may be useful for compositor work. This includes Normals, Uvs, and Shadow. The passes that combine to make the full image are the Diffuse, Glossy, Transmission, and recently added Subsurface. These each have Direct, Indirect, and Color. You also need the Environment and Emission passes.

Combine Passes node group. Click for full size.
Direct passes contain data for light that directly hits the model. This makes them closest to the final image we see. Indirect passes are light that bounces off other surfaces before hitting the model. They pick up a lot of the nuances in the geometry. Color is the material color without shading applied.
For most simple compositor effects, you do your manipulations on the entire image. But as things get more advanced, it is necessary to make changes to individual passes in order to isolate parts of the image. After making your adjustments, you need to recombine all of the passes. How to do this is shown in the Blender Cycles Passes documentation. I suggest doing it as a node group. Note that this image does not contain any subsurface scattering (SSS), and so my Subsurface passes are all empty (black). I have left them disconnected to reduce clutter and made their group inputs default to black instead.
The Filters

Diffuse Direct with and without filter. Click for full size.
The Diffuse and Glossy Direct and Indirect each have an adjustment. I originally made this as a quick and dirty test to see how things would look. They looked interesting enough to be worth posting a picture to the facebook page, and enough people were interested that I decided to write this up. However, the filters used here each have their problems, and these are not ideal settings. I do not know if I would use any of them for a final piece of artwork, but it is useful to understand them, and others may wish to experiment.
Diffuse Direct
The filter used here is Dilate/Erode, which enlarges or shrinks whatever you put into it. In this case, it is shrinking the area of the character, causing more black around the edges. This contributes to the edge lining effect. Dilate/Erode causes bad aliasing (jagged edges on diagonals). To reduce this, and soften its effects, it is blurred.
Diffuse Indirect
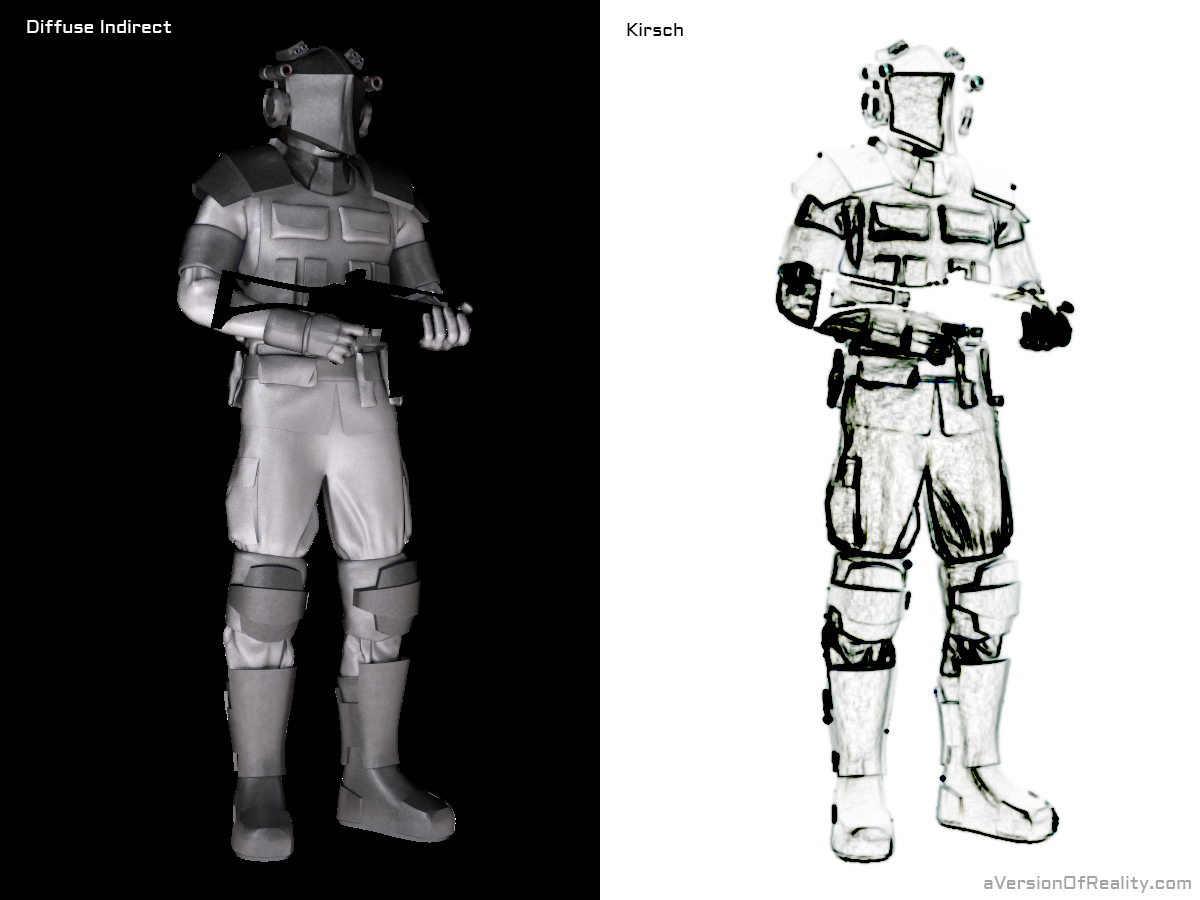
Diffuse Indirect with and without filter. Click for full size.
The largest change to the image comes from the Kirsch filter used here. Kirsch is an edge detection filter, with a side effect of creating a lot of squiggly high-frequency noise. It turns things white, so it needs to be inverted in this case. A small blur helps reduce the harshness. This all creates strong black lines on edges, deepening shadows and amplifying the edge lining effect. The high frequency noise helps break up the smoothness of the image, a similar effect to what might be done with charcoal rubbings or pencil scribbling. The effect on this layer is extremely strong and looks quite ugly on its own. But it needs to be this powerful to still make a difference after being mixed in with the rest.
Kirsch is a fun tool, but it has problems. Artistically, it makes a bit of a mess. For this particular image, that works out. But that is because I found a Factor that worked. However, I'd probably need entirely different settings for other sorts of characters or objects. This makes it less useful as a global part of a style. In the end, I'd like a set of compositor nodes that I can plug almost anything into and have it work out with minimal tweaks.
The larger issues are technical. Kirsch can easily create fireflies—individual pixels with extremely high values. These can take additional nodes to remove, but cannot always be removed cleanly. If left in, they can cause big problems depending on what other nodes you use. For example, see the large black dots around the shoulders, boots, and knee pads. These are caused by the extreme values of the firefly pixel being blurred over to neighboring pixels.
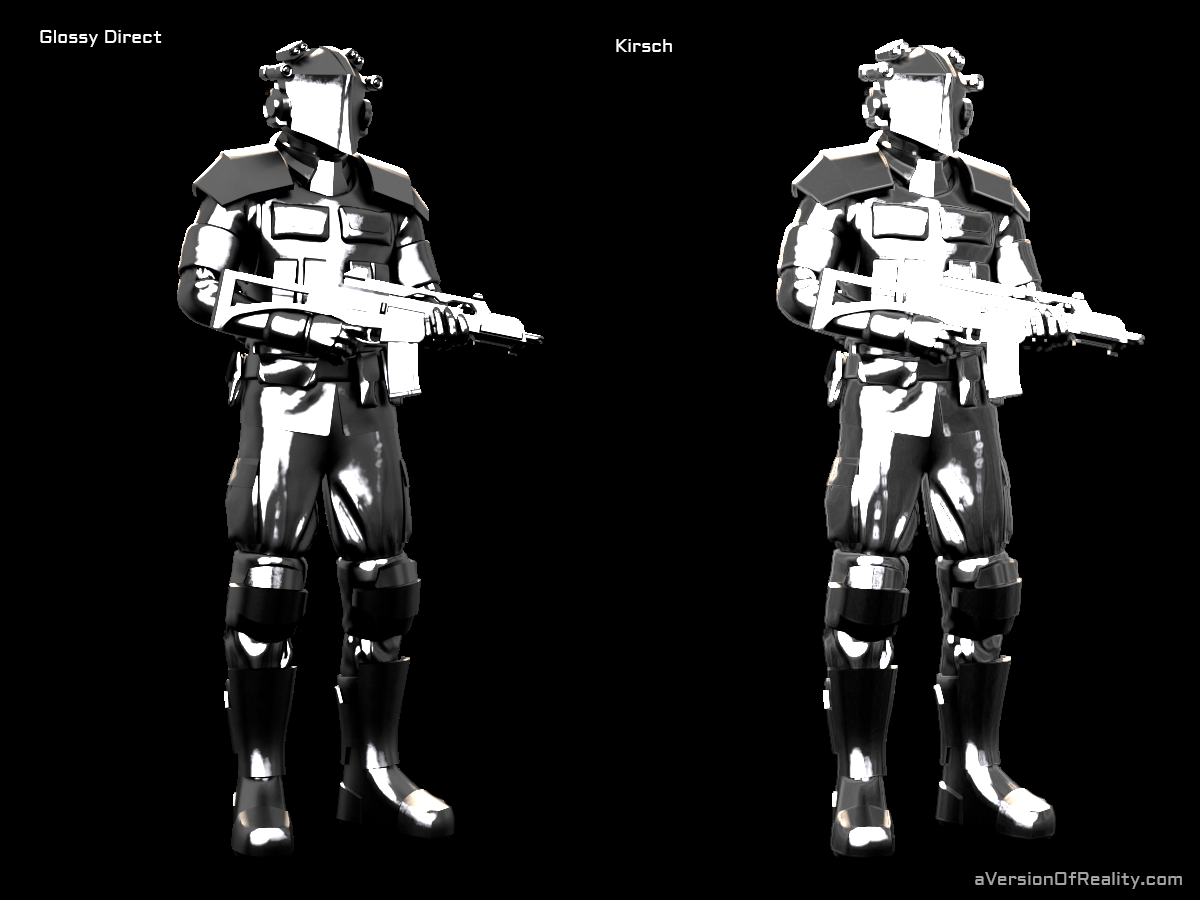
Glossy Direct with and without filter. Click for full size.
These fireflies could be helped by properly Clamping the Kirsch result, but this introduces other problems. Kirsch gives results that are not restricted between 0 and 1, as most values are. This gets much worse if you use factors above 1. The reason it is so visible in the final image is because it has values as high as the 5 (or -5 after being inverted.) When the passes are combined, these high values beat out the more reasonable values between 0 and 1 coming from other passes. This could be solved with other combining methods, but that faces other Clamping challenges. More on that further down.
Glossy Direct

Glossy Indirect with and without filter. Click for full size.
Kirsch again here. But this time at a very weak value so it causes less problems. And since we want this area to be white, there's no need to invert it. It's enlarging the light areas and creating some fake rim lighting, but its also creating nasty jagged edges.
Glossy Indirect

Ambient Occlusion with and without curve. Click for full size.
Here we have Dilate/Erode again, but in a much different manner. In the Diffuse Direct we used it in Step mode, which gives harsh edges. In Feather, the change is a smoother gradient, and this time we are using it with positive values. It is also boosting our lights and highlights, but in different areas from the Glossy Direct pass. There are some strange areas, but this pass is so weak that they don't show up in the combined image.
Ambient Occlusion Darkening
This change isn't to a pass, but to the whole image after combining passes. I wanted to darken up the crevices of the object. Ambient Occlusion creates shadows in crevices and recessed areas. It is lighting based on ambient illumination rather than any specific light source. You get an AO pass in the compositor regardless of if you are actually using AO in your render or not.
Using AO like this at all is automatically an NPR effect, as it ignores your lights and messes up the conservation of energy of your image. But we don't care about that here, so there's no particular downside to using it. I use a fairly extreme curve to further darken the shadows of the AO pass, and also to enlarge the size of the dark areas. Then it is mixed into the combined image, darkening the whole thing in those areas.
The big problem: Inconsistent Value Ranges
Earlier, I mentioned problems with values outside the 0 to 1 range. For those less familiar with the math behind images, I will explain why this is an issue: Color value is expressed as a number between 0 and 1, 0 being black and 1 white. Every pixel in an image has its own value. This mathematical representation is why we can use images as factors in the place of a number, and why we can do math on images at all. You are really doing that math on the value of each pixel.
However, problems arise when you start having values that are not Normalized, meaning not between 0 and 1. These are difficult to spot because anything greater than 1 is still white, and anything less than 0 is still black (you can check the values by going into the UV/Image viewer and holding down click, or by using greater or lesser than math on your image). Normally, all values from a render will be properly normalized, with the exception of Fireflies, which are essentially a glitch. However, when we start working on things in the compositor, we can easily get outside this normal range.
As you start doing operations (especially that involve addition or subtraction), you can move your images outside normal ranges. This is where that Clamp check box that so many nodes have comes in: Clamp changes all number above 1 to 1, and below 0 to 0. This solves your problems in some areas, but creates problems in others, depending on the image and what operation you are doing.
What this means here
This becomes a problem when combining passes. Your Combined pass is properly normalized, but when broken down into pieces, that can change. Consider the Diffuse: It is The Direct plus the Indirect multiplied by the Color. They may be normalized when combined, but there is multiplication by a value less than 1 present, which is going to considerably cut down the numbers from the other passes. If they are going to end up as a value within proper range after being reduced from this multiplication, then they have to start out high, usually as values above 1. In the case of my image, the Diffuse Direct has values as high as 5, but the Indirect does not go above 1, and the Color is very low.
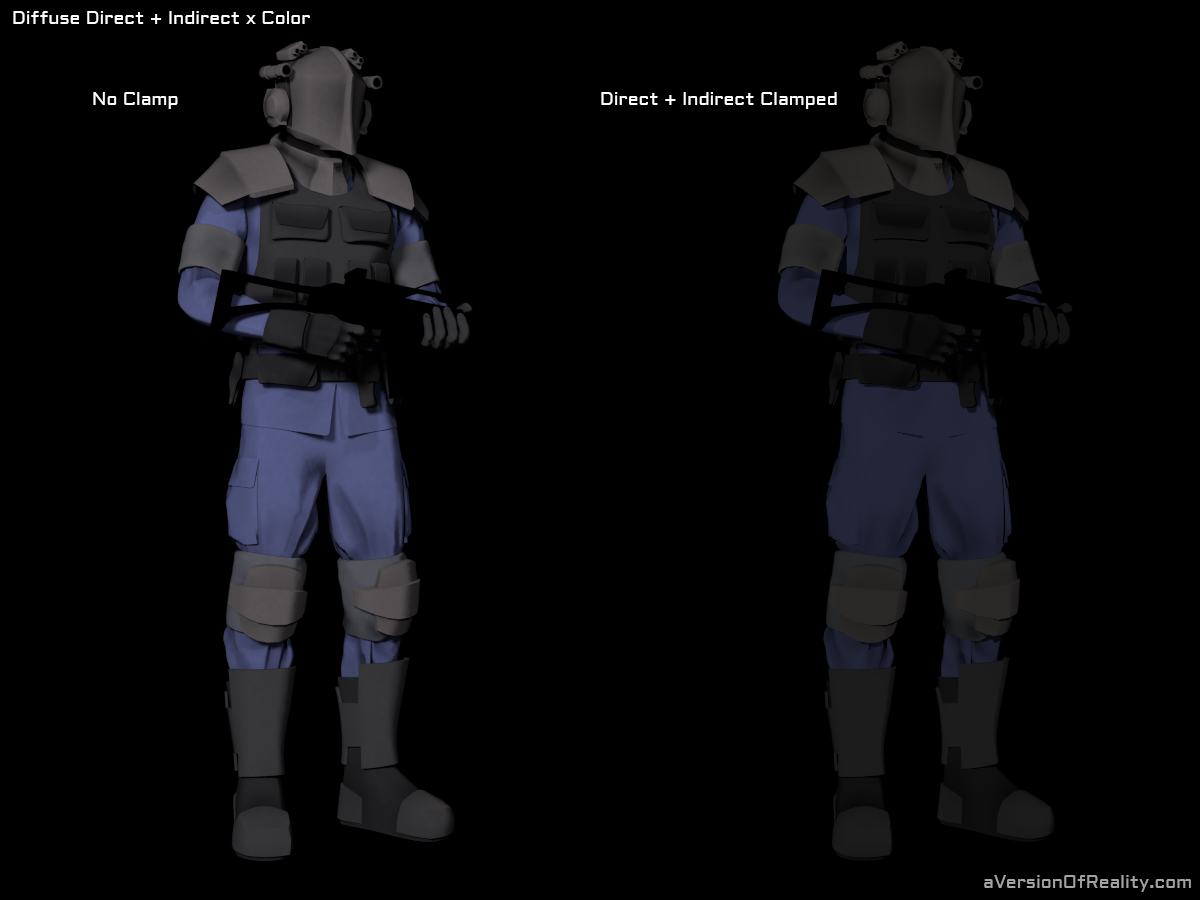
Clamping the addition of Diffuse Direct and Indirect makes for a very different image. Click for full size.
In other words, the Color pass is normal values, but the Direct and Indirect are often not (and just what they are depends on the lightness or darkness of your image.) If you Clamp the addition of the Direct and Indirect, your image gets darker.
Why not just leave it unclamped?
Most compositor operations behave fine if working on normalized values (but not all.) If your values are outside normal ranges, then most operations will make them even MORE outside that range. For example, in this image the Diffuse Indirect has values inside normal ranges, but once Kirsched and inverted, it goes crazy, with values as low as -4, and some inverted fireflies as low as -150. This causes the results of your combined math to be within very different ranges.
Not WYSIWYG

I added a multiply node after the Blur in Diffuse Indirect to clamp it. When clamped, the Kirsch's effect is still there, but is weaker. Click for full size.
The point to take from all of this is that what you see is not necessarily what you get, and the reason for this is the math going on behind the scenes. If you have extreme values in some of the passes you are combining, they will have massively more strength on the final image than others. You may want this at times. It was nice for me to look at the amount of black I was getting from my Kirsch on its own, and know I'd have a similar amount on the combined image. But often, your results will not look how you expect, because we are blind to anything outside the normal range.
The ranges we get vary greatly based on the properties of the render, and the changes we make. This makes it difficult to make any universal node setups. Its fine when working on single images like I am here, because we can adjust our values to the image. But if we were doing animation, we could find that a slightly different camera angle may mean different values in the base render, which can mean dramatically different values after compositor operations, breaking the style. It will also fall apart if there is too much variance in the scene: a setup that works in a dark scene may look terrible in a light scene.
What is necessary to keep things consistent is a way to normalize these values at each stage. This is theoretically possible, but I haven't figured it all out yet. Maybe that will be my next post. For now, just keep in mind that the compositor does some cool stuff, but if things are not looking the way you expect them to, start checking your math.
Follow me on Facebook to see work in progress images, and to be notified of future updates.